Real-Time Sentiment Analysis with Docker, Kafka, and Spark Streaming
A Step-By-Step Guide to Deploying a Pre-trained Model in an ETL Process
In one of my previous articles, I compared different classification algorithms and feature extraction functions implemented in PySpark for the sentiment analysis of tweets. This article is a continuation of that project but you can read it and follow the tutorial without having read the previous one!
For the problem posed at that time, we found that the logistic regression model was the best. Today, we will see how to perform this sentiment analysis in real-time on the topic of our choice with Apache Kafka and Spark Streaming.
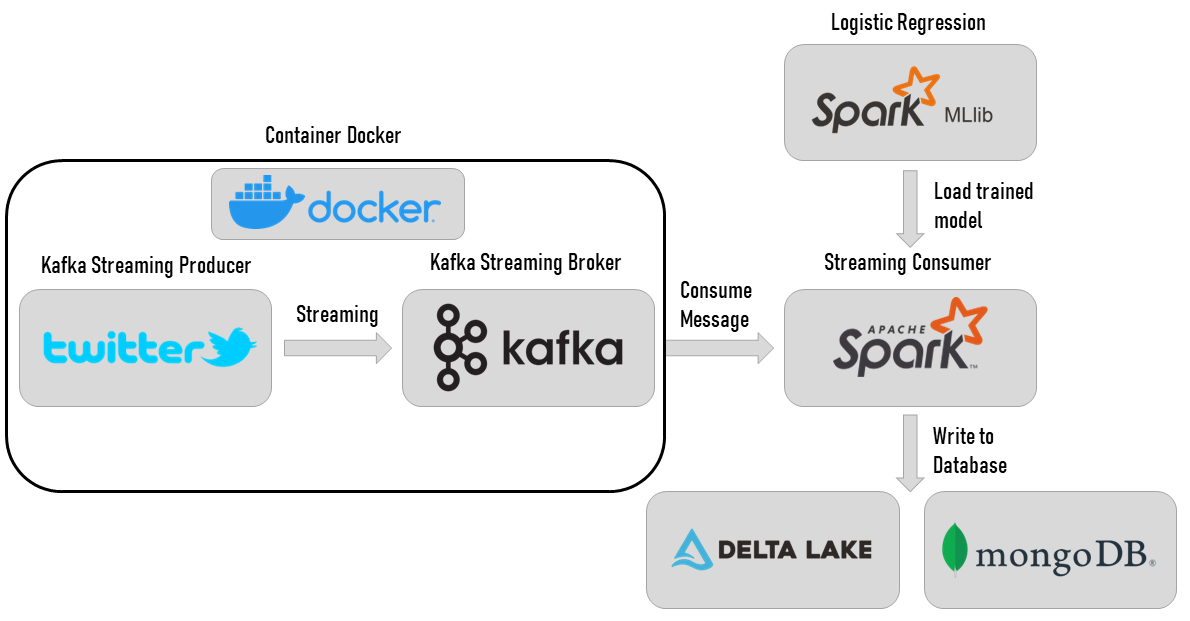
As you may have noticed on the diagram below, the process that will be implemented looks very much like an ETL process. As a reminder, ETL stands for Extract Transform Load and refers to a process generally used in Business Intelligence to extract data from an operational system, apply transformations to clean and validate it, and finally load it into a database or a data warehouse.
In our case, we will extract data from the Twitter API, create a data stream using Apache Kafka to send it to the model, transform this data to perform real-time sentiment analysis with Spark Streaming and load the results to Delta Lake or MongoDB.
Our approach will consist of the following steps:
- Installing Docker Desktop
- Launching Apache Kafka via a Docker container
- Creating a Kafka Producer
- Creating a Kafka Consumer
- Finding what to do with those results!
The whole code of this project is available on my GitHub.
Note: versions → Python 3.10.6 | Spark 3.3.0 | PySpark 3.3.0 | Kafka 7.3.0
Installing Docker Desktop
Depending on your operating system, the installation instructions are not the same. Docker is available on Windows, Mac, and most Linux distributions. In my case, I’m on a Windows system so I’ll detail those steps here but you’ll find on these links the instructions for Mac and Linux.
The main difficulty to install Docker Desktop on Windows is the installation of WSL2. WSL stands for Windows Subsystem for Linux and it is mandatory to have it installed for Docker to work.
You can find here the detailed tutorial from Microsoft for the installation of WSL on Windows. Be sure to go to the end of the tutorial to upgrade WSL to WSL2.
Once this is done, you can download the Docker executable, follow the classic installation steps, and land on this beautiful interface!

Container with Apache Kafka
Now that Docker is installed, we will be able to use Apache Kafka more easily using a container. But why Kafka exactly?
In recent years this tool, or at least tools of this type, have become almost indispensable to large organizations. Consider it as a central hub or message broker that permits data exchange across various systems. It can manage a lot of data and distribute it to a lot of users, making sure that every message is sent in the order that it was created.
To give you an idea of the usage rate, on their official website, Apache Kafka proudly announces the following fact.
More than 80% of all Fortune 100 companies trust, and use Kafka. [2]
To fully understand how it works, it is necessary to define some vocabulary words specific to this tool.
- Zookeeper: It is a distributed coordination service that is used by Apache Kafka to store and manage Kafka cluster metadata, such as information about Broker nodes, Topic partitions, and Consumer offsets. Zookeeper also ensures the high availability of Kafka by providing replication of configuration data across multiple nodes.
- Producer: It is a sort of application that sends data to a Kafka cluster. The data sent by the Producer is typically stored in topic partitions, which are then distributed to the various Brokers in the cluster. Producers can also specify the partition key for the messages they send, in order to control how the messages are distributed to the different partitions.
- Broker: It is a Kafka server that stores topic partitions. Each topic partition is replicated across multiple Brokers to ensure high availability and fault tolerance. Brokers are also responsible for managing read and write requests from Consumers and Producers.
- Consumer: It is an application that reads data from a Kafka cluster. Consumers can be configured to read data from specific topic partitions and to control the speed of data reading by adjusting offsets.
In our case study, we are on a small scale. Thus, we only need a Kafka cluster with a single Zookeeper and a single Broker. You will find in the GitHub repository, the Docker image for this type of Kafka cluster but you will find here other images that you can use for larger projects.
After cloning the repository containing all the Kafka images and my repository for this project, open a command prompt and type the following command
docker-compose -f zk-single-kafka-single.yml up -dThe -d flag makes it run in the background.
To check that everything is working properly, you can type the following command.
docker-compose -f zk-single-kafka-single.yml psYou can customize the ports, hostnames, and container names directly in the zk-single-kafka-singe.yml file.
We can now run commands on our Kafka cluster running with Docker.
docker exec -it kafka1 /bin/bashWe can for example print Kafka’s version to check that everything is fine.
kafka-topics --version
Okay, we managed to run Apache Kafka locally with a Zookeeper and a Broker, but as explained above, we are still missing a Topic to connect the Consumer and the Producer.
kafka-topics --create --topic twitter --bootstrap-server localhost:9092
kafka-topics --describe --topic twitter --bootstrap-server localhost:9092
The first command allows us to create a topic called twitterto store events. The second command displays the description of the newly created topic.
Note: If this is not the first time you have created this topic and you come back to this article to review what to type in the command prompt, there is no need to create it again! It is already saved.

That’s it for Kafka, now let’s do some Python to create our Consumer and Producer.
Creating a Kafka Producer
For your information, since we are going to connect to the Twitter API data stream, if you want to experiment on your side, you will need to get your API keys.
Let’s start by importing the necessary libraries, the API keys, and creating an empty producer. For this use case, we will analyze the sentiments of the tweets containing the keyword ChatGPT because this will guarantee us a continuous and important data flow.
import tweepy
from kafka import KafkaProducer
import logging
import json
from decouple import config

"""API ACCESS KEYS"""
consumerKey = config('CONSUMERKEY')
consumerSecret = config('CONSUMERSECRET')
accessToken = config('ACCESSTOKEN')
accessTokenSecret = config('ACCESSTOKENSECRET')

logging.basicConfig(level=logging.INFO)
# Create the producer
producer = KafkaProducer(bootstrap_servers='localhost:9092')
search_term = 'ChatGPT'  # Modify this string to decide what to analyze
topic_name = 'twitter'  # Modify this according to your topic name
We also have a function to connect to the Twitter API through the Tweepy library.
def twitterAuth():
    # create the authentication object
    authenticate = tweepy.OAuthHandler(consumerKey, consumerSecret)
    # set the access token and the access token secret
    authenticate.set_access_token(accessToken, accessTokenSecret)
    # create the API object
    api = tweepy.API(authenticate, wait_on_rate_limit=True)
    return api
Now, let’s create a class that will allow us to react to the incoming data flow from the API as well as to potential errors.
class TweetListener(tweepy.Stream):

    def on_data(self, raw_data):
        # logging.info(raw_data)

        tweet = json.loads(raw_data)

        if tweet['data']:
            data = {
                'message': tweet['data']['text'].replace(',', '')
            }
            producer.send(topic_name, value=json.dumps(data).encode('utf-8'))

        return True

    @staticmethod
    def on_error(status_code):
        if status_code == 420:
            # returning False in on_data disconnects the stream
            return False

    def start_streaming_tweets(self, search_term):
        self.add_rules(tweepy.StreamRule(search_term))
        self.filter()
As you can see, this class has 3 methods.
on_data(self, raw_data): is called when TweetListener receives data from the API. We parse the text and send it to the Consumer viaproducer.send.on_error(status_code): cuts the data stream when an error occurs.start_streaming_tweets(self, search_term): is the entry point of the data stream.
At the bottom of our producer.py file, we can connect our Producer to the Twitter API data stream and transmit this data to the Twitter topic in the following way.
if __name__ == '__main__':
    twitter_stream = TweetListener(bearerToken)
    twitter_stream.start_streaming_tweets(search_term)
And voila! You can see the data flow through the producer by running the file python producer.py .

All that remains is to connect our Consumer to the Producer stream and transform the data as we wish. The complete code for this section can be found in the file producer.pyon Github.
Creating a Kafka Consumer
Let’s create the entity that will consume the data stream.
import re
import findspark
from pyspark.ml import PipelineModel
from pyspark.sql import SparkSession
from pyspark.sql.functions import from_json, udf
from pyspark.sql.types import StructType, StructField, StringType, ArrayType


if __name__ == "__main__":
    findspark.init()

    # Path to the pre-trained model
    path_to_model = r''

    # Config
    spark = SparkSession \
        .builder \
        .master("local[*]") \
        .appName("TwitterSentimentAnalysis") \
        .config("spark.jars.packages", "org.apache.spark:spark-sql-kafka-0-10_2.12:3.1.2") \
        .getOrCreate()
We imported all the necessary libraries and created our Spark object. Note that you have to change the value of path_to_modelif you want to use another model than mine. Note also that we have added an external dependency allowing us to use Apache Kafka with Spark.
# Schema for the incoming data
schema = StructType([StructField("message", StringType())])

# Read the data from kafka
df = spark \
    .readStream \
    .format("kafka") \
    .option("kafka.bootstrap.servers", "localhost:9092") \
    .option("subscribe", "twitter") \
    .option("startingOffsets", "latest") \
    .option("header", "true") \
    .load() \
    .selectExpr("CAST(value AS STRING) as message")

df = df \
    .withColumn("value", from_json("message", schema))
Above, we created a schema that represents the format of the data incoming and we use Spark object to directly read the stream. We connect to the Twitter topic that we created previously, retrieving directly the last data and we cast the output value as a string (the text of the tweet).
# Pre-processing the data
pre_process = udf(
    lambda x: re.sub(r'[^A-Za-z\n ]|(http\S+)|(www.\S+)', '', x.lower().strip()).split(), ArrayType(StringType())
)

df = df.withColumn("cleaned_data", pre_process(df.message)).dropna()

# Load the pre-trained model
pipeline_model = PipelineModel.load(path_to_model)
# Make predictions
prediction = pipeline_model.transform(df)
# Select the columns of interest
prediction = prediction.select(prediction.message, prediction.prediction)
Here, we created a preprocessing function and applied it to the message column of the dataframe. Then we loaded the pre-trained model, used it to transform the dataframe data according to the pipeline defined during training (feature extraction, etc), and selected the columns we were interested in.
Now we just need to display the results in the console to see what happens!
# Print prediction in console
prediction \
    .writeStream \
    .format("console") \
    .outputMode("update") \
    .start() \
    .awaitTermination()
When we run this file via python consumer.py, and the producer is running as well, we can see the sentiment analysis in real-time on the keyword of our choice.
Here I have restricted the size of the output columns because otherwise, they encroach on several rows, but if you want to analyze the results directly in the console you can change this option.
prediction \
    .writeStream \
    .format("console") \
    .option("truncate", False) \ # Set truncate option to False
    .outputMode("update") \
    .start() \
    .awaitTermination()
The complete code for this section can be found in the file consumer.pyon Github.
What to do with those results?
Well, it depends on you and what you want to do. In the example above, I simply displayed the results in real time in the console, it is not very interesting…
Saving results locally
You can for example save the results locally and analyze them later using Tableau or PowerBI.
prediction.writeStream \
   .outputMode("append") \
   .format("json") \
   .option("path", saving_path) \
   .option("header", True) \
   .option("checkpointLocation", check_path) \
   .start() \
  .awaitTermination()
When saved in JSON format, as shown above, the results look like this.

The Python script to save the real-time sentiment analysis locally can be found in the file consumer_local.pyon GitHub.
Loading results in MongoDB
Between us, it would be a shame to have installed Docker, created a data stream with Kafka and save the results locally in a JSON format. Let’s try loading those results in a MongoDB database instead.
Let’s start by defining a function that will save a row in our database.
def write_row_in_mongo(dataframe):
    mongo_uri = "mongodb://[username:password@]host1[:port1][,...hostN[:portN]][/[defaultauthdb][?options]]"

    dataframe.write.format("mongo").mode("append").option("uri", mongo_uri).save()
As you can see, you will need to retrieve the URI of your database. For this, I refer you directly to the MongoDB documentation.
Another change to make is to add three new external dependencies when creating our Spark object.
spark = SparkSession \
    .builder \
    .master("local[*]") \
    .appName("TwitterSentimentAnalysis") \
    .config("spark.mongodb.input.uri",
            "mongodb://[username:password@]host1[:port1][,...hostN[:portN]][/[defaultauthdb][?options]]") \
    .config("spark.mongodb.output.uri",
            "mongodb://[username:password@]host1[:port1][,...hostN[:portN]][/[defaultauthdb][?options]]"
            ) \
    .config("spark.jars.packages", "org.mongodb.spark:mongo-spark-connector_2.12:3.0.1") \
    .config("spark.jars.packages", "org.apache.spark:spark-sql-kafka-0-10_2.12:3.1.2") \
    .getOrCreate()
Finally, we must now use our previously defined function to write the results of each batch to the database. Below, for each batch of data, we execute our function to write to the database.
# Load predictions in Mongo
query = prediction.writeStream.queryName("tweets") \
    .foreachBatch(write_row_in_mongo).start()
query.awaitTermination()
The complete code for this section can be found in the file consumer_mongo.pyon Github.
Loading results in Delta Lake
Finally, another way to load the results is to use Delta Lake. The choice between MongoDB and Delta Lake depends on the use case and requirements of your project.
Since the code changes are very similar to those for MongoDB, I have put all the changes into a single code snippet.
def write_row_in_delta(df):
    deltaPath = config('DELTAPATH')
    df.write.format("delta").mode("append").option("mergeSchema", "true").save(deltaPath)

# ...

spark = SparkSession \
     .builder \
     .master("local[*]") \
     .appName("TwitterSentimentAnalysis") \
     .config("spark.jars.packages", "io.delta:delta-core_2.12:1.1.0") \
     .config("spark.jars.packages", "org.apache.spark:spark-sql-kafka-0-10_2.12:3.1.2") \
     .getOrCreate()

# ...

query = prediction.writeStream \
     .foreachBatch(write_row_in_delta) \
     .option("checkpointLocation", "/tmp/checkpoint") \
     .start()
The complete code for this section can be found in the file consumer_delta.py on GitHub.
Conclusion
In this article, we have seen, step by step, how to implement an ETL process for the sentiment analysis of tweets in real-time.
For this, we have seen the steps to install Apache Kafka on a Windows system using Docker. This allowed us to first develop a Producer and connect it to the Twitter API to retrieve tweets containing the keyword of our choice. In the second step, we developed a Consumer that could connect to the data stream handled by Kafka.
Finally, we experimented with three methods to load the sentiment analysis results :
- Locally in JSON format for a quick analysis
- Classically with a database on MongoDB
- In a Data Lake Storage System with Delta Lake
The main objective of this project was to show you how an ETL process works and how to implement it from scratch using professional tools such as Spark Streaming and Apache Kafka. In my example I chose the keyword “ChatGPT” to retrieve data on Twitter, but it’s up to you now to find a topic that interests you or to analyze more deeply the results of the sentiment analysis by connecting PowerBI or Tableau to your database. Have fun 😁!
Want to connect?
- 📖 Follow me on Medium
- 💌 Subscribe to get an email whenever I publish
- ☕Fancy a coffee in Paris to discuss AI ?
- 🤓 Connect with me on LinkedIn
I’ve also written:
References
[1] My previous article on training models in PySpark
[2] Statistics on the share of Apache Spark usage by Fortune 100 companies

