Detecting objects with YOLOv5, OpenCV, Python and C++

It is not uncommon people to think of computer vision as a hard subject to understand and, also, hard to get running. Indeed, not long ago, coding computer vision applications were a highly specialized task requiring a deep knowledge of machine learning and strong understanding of the underlying computer infrastructure in order to achieve a minimally acceptable performance.
Today, this is no longer true. Or at least, not true for a family of computer vision tasks known as “Object Detection”. Here we are going to discuss one of the most high-performing object detector today: Ultralytics YOLO v5
In this article, I’m going to show how to easily use YOLO v5 — the state-of-art object detection engine — to identify elements in an image. As case study, we will use OpenCV, Python and C++ to load and call our YOLO v5 model.

What is object detection
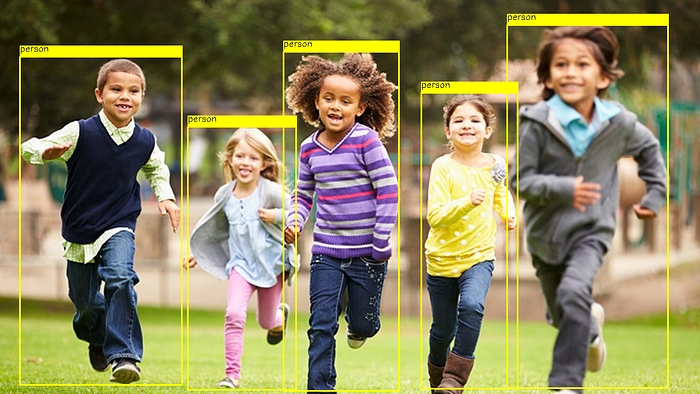
Object detection is one of the most prominent computer vision tasks. In a nutshell, given an image, an object detector will find:
- the objects in the image
- their types (usually called class)
- the bound box representing the object coordinates in the image.

For each object, the object detection algorithm assign a confidence value representing how certainty it is about that detection.
How object detectors know how to detect the objects?
Object detectors like YOLOv5 are trained to detect objects. This train consists on using a bunch of images and respective annotations to adjust the model and make it learn how to detect the objects.
The result of this train is a model file. YOLOv5 has a set of models previously trained using the MS COCO dataset. These pre-built models are able to detect objects like persons, cars, bikes, dogs, cats, planes, boats, etc…

We can train YOLOv5 ourselves in order to teach it to detect other types of objects. Indeed, training YOLOv5 is incredibly easy. This topic is covered in another story.
The big picture of using YOLOv5 here
Basically, our program performs 4 simple steps:
- load the YOLOv5 model
- feed an image to get predictions
- unwrap the output to get the classes and bound boxes for each object
- use the output to decorate the image
Let’s getting started!
Step 1 — Loading the YOLOv5 model
This step consists of one line of code to import the model
Python:
In C++:
You may be wondering what is the file yolov5s.onnx and where can you find it.
yolov5s.onnx is the model file in a format recognized by OpenCV. The original file, yolov5s.pt, can be found in the YOLOv5 github repository.
In order to OpenCV read the model file, it is necessary to convert it to the ONNX format. That is why we are using yolov5s.onnx here.
Converting YOLOv5 models to different formats can be easily done following the instructions here.
For you convenience, you can just donwload my `yolov5s.onnx`here.
Step 2 — Inputting an image to get predictions
YOLOv5 waits an input image with the following specs:
- RGB format
- pixel values in [0, 1[
- size 640x640
Thus, we need to format our arbitrary images to these specs before call the YOLOv5 model. This is what format_yolov5 the does:
The C++ code for format_yolov5 is:
Note that, by default, OpenCV loads colored images as BGR. The manipulation of the source image to get the squared one is illustrated bellow:

Once the image is formatted, calling the model is simple as:
or in C++:
99% of the CPU usage of our program is demanding in this step. Now, let’s check how to use the outputresult.
Step 3— Unwrapping the output
In the previous step, YOLOv5 performed the object detection returning all the detections found in a output 2D array. The image below represents the structure of this data:

This array has 25,200 positions where each position is a 85-length 1D array. Each 1D array holds the data of one detection. The 4 first positions of this array are the xywh coordinates of the bound box rectangle. The fifth position is the confidence level of that detection. The 6th up to 85th elements are the scores of each class. The code below shows how to unwrap the data from the 2D array:
Of course, not every detection out of the 25,200 are actual detections. We use some threshold values to prune the low confidence detections out using if confidence > 0.4: test.
It is noteworthy that YOLOv5 believes that the input image is 640x640. Thus, it is necessary to re-scale xywhcoordinates to the actual input dimensions:
x, y, w, h = row[0], row[1], row[2], row[3]
left = int((x - 0.5 * w) * x_factor)                                             top = int((y - 0.5 * h) * y_factor)                                             width = int(w * x_factor)                                             height = int(h * y_factor)                                             box = [left, top, width, height]                                             boxes.append(box)
We also used cv2.minMaxLoc to find the class id with max score for each detection.
Even filtering the low level confidence detections, the previous code will generate duplicated boxes:

Of course, this overlapping is undesired. To avoid it, usually it is used the Non-maximum Suppression (NMS) algorithm to remove overlapping/duplicated detections:

The C++ code to unwrap the predictions with NMS pruning is here:
Step 4— Printing the resulting image
The hardest part of our work is done. Now, let’s use the resulting predictions to print an image with its detections:
There is no rocket science in this code. We just use the OpenCV functions to print the detected boxes and class labels.
Additional (but important) topic: CUDA
Running computer vision requires a lot of processing time. Usually, even powerful CPUs are not enough to provide a real time object detection.
Computers with NVIDIA cards can use their GPUs to process their codes by using a technology called CUDA. Luckily, using CUDA here in our case study is pretty simple. Basically, ask the model to use it:
Or using C++:
If you don’t have a computer with an NVIDIA card, the code will automatically switch back to CPU mode. If you have a computer with an NVIDIA card but the code does not run on GPU, maybe you need to re-install OpenCV with CUDA support.
Finally, using YOLOv5 with CUDA, we can achieve real-time performance:
Full code
The full code used here can be found in this github repository.


